

Where Flavor Meets Simplicity
Let’s be honest—there’s something oddly satisfying about unwrapping a homemade granola bar. Maybe it’s the smell of toasted oats wafting through the kitchen, or the way the honey sticks to your fingers as you press everything into the pan. But for me, it started on a crisp October morning in Vermont. The leaves were blazing orange, school lunches were due, and the store-bought options? Overly sweet, overpriced, and suspiciously shelf-stable.
That’s when I made my first batch of homemade granola bars—an American classic reinvented for modern kitchens. Originally gaining traction in the U.S. in the 1970s as part of the natural foods movement, granola bars quickly became a staple snack across North America and Europe. Why? They’re portable, customizable, kid-approved, and adult-satisfying. Whether you’re rushing to work, hiking a trail, or just avoiding another vending machine disappointment, these bars have your back.
Today, we’re bringing that tradition into your home with a foolproof, flexible recipe that works for almost every dietary style—from gluten-free and vegan to high-protein or low-sugar. What makes this recipe different? It doesn’t rely on obscure ingredients or expensive gear. It’s built on whole foods, simple swaps, and flavor you control.
By the end of this guide, you’ll know not just how to make granola bars at home, but how to own the process. And if you’re anything like me, you’ll wonder why you ever bought them in the first place.
Ingredients for Homemade Granola Bars (with Healthy Alternatives)
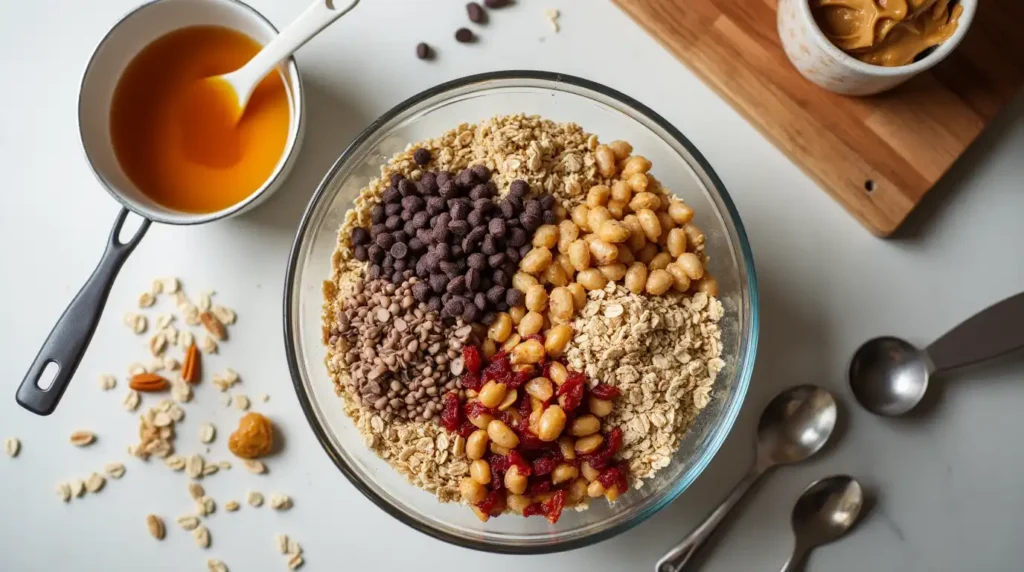
Creating your own homemade granola bars starts with a solid base—and a little creativity. This recipe keeps things simple but flexible, so you can tailor it to your taste or dietary needs without sacrificing flavor or texture.
Core Ingredients
- Old-fashioned rolled oats – 2 cups
Base of the bars; provides chew and fiber. Use certified gluten-free oats if needed. - Honey – ½ cup
Natural binder and sweetener. Sub with maple syrup for a vegan version. - Nut butter (peanut, almond, or cashew) – ½ cup
Adds richness and helps everything stick. Sunflower seed butter is a great nut-free option. - Chopped nuts (walnuts, almonds, pecans) – ½ cup
Crunch factor. Toast them first for extra flavor. - Dried fruit (cranberries, raisins, apricots) – ½ cup
Adds sweetness and chewiness. Chop larger fruits finely. - Mini dark chocolate chips – ¼ cup
Totally optional—but c’mon, why not? - Vanilla extract – 1 tsp
Adds depth and aroma. - Salt – a pinch
Balances the sweetness.
Smart Substitutions & Healthy Twists
- Low-Sugar Option: Replace half the honey with mashed banana or date paste.
- High-Protein Boost: Add ¼ cup protein powder (vanilla or unflavored).
- Fiber Boost: Mix in 2 tbsp of ground flaxseed or chia seeds.
- Vegan Version: Use maple syrup + a plant-based nut butter (like almond or sunflower).
- Gluten-Free: Always use oats labeled “certified gluten-free.”
Pro Tips for Choosing Quality Ingredients
- Use unsweetened nut butters to control the sugar content.
- Go for organic dried fruits without added sugar or sulfur.
- Buy oats and nuts in bulk—they store well and save money over time.
- Avoid quick oats—they make the bars too crumbly.
FAQ – Can I skip the dried fruit?
Absolutely. If you’re not a fan of dried fruit, try subbing in shredded coconut, pumpkin seeds, or more nuts. Just keep the dry-to-wet ratio consistent so the bars hold together.
How to Make Homemade Granola Bars – Step-by-Step Instructions
Making homemade granola bars is easier than you might think. With just one bowl and a baking pan, you’ll have a batch ready in under an hour. Here’s exactly how to get that perfect chewy (or crunchy) texture, every time.
Prep Time: 10 minutes
Chill Time: 1–2 hours
Bake Time (if desired): 15–20 minutes at 325°F
Yield: About 12 bars
Step-by-Step Directions
- Line your pan
Use an 8×8-inch or 9×9-inch square baking dish. Line it with parchment paper, leaving overhang on the sides for easy lifting later. - Mix the dry ingredients
In a large bowl, combine:- 2 cups rolled oats
- ½ cup chopped nuts
- ½ cup dried fruit
- ¼ cup chocolate chips
- Pinch of salt
Optional: Add flaxseed, chia seeds, or protein powder now.
- Heat and mix the wet ingredients
In a small saucepan over low heat, stir together:- ½ cup honey (or maple syrup)
- ½ cup nut butter
- 1 tsp vanilla extract
Stir until fully blended and smooth—don’t let it boil.
- Combine wet and dry
Pour the warm mixture over the dry ingredients. Mix thoroughly until all dry bits are coated. Use a rubber spatula or your hands (once it cools slightly). - Press into the pan
Transfer mixture to your prepared pan. Use a flat spatula or press firmly with your hands (parchment helps here) to compact the mixture evenly. - Chill or Bake (your call!)
- For no-bake bars: Cover and refrigerate for 1–2 hours until firm.
- For chewy baked bars: Bake at 325°F for 15–20 minutes. Let cool completely in the pan before cutting.
- Slice & Store
Lift the chilled/baked slab using parchment edges. Slice into 12 bars using a sharp knife. Store in an airtight container at room temp for up to 1 week—or refrigerate for longer shelf life.
What if my granola bars won’t stick together?
If your mixture is too dry, warm a bit more honey or nut butter and stir it in. Also, press the mix very firmly into the pan. Loose pressing = crumbly bars.
Tips & Flavor Variations for Homemade Granola Bars
Once you’ve mastered the basic homemade granola bars recipe, it’s game on for customizations. This section is where you can really make the bars your own—whether you’re aiming for indulgent, high-protein, allergy-friendly, or snack-for-the-kids vibes.
Tips for Perfect Granola Bars Every Time
- Compact = Cohesion: Pressing the mixture firmly into the pan is the key to preventing your bars from falling apart. Use parchment paper to avoid sticky hands and press down hard.
- Warm before slicing: If you’re cutting cold bars, let them sit for 5 minutes first. This softens the fats just enough to get clean edges.
- Taste as you go: Once the wet mixture is added to the dry, take a small bite before chilling/baking. It’s safe to taste, and now’s the time to adjust sweetness or salt.
- Chill > Freeze: Freezing right away can dry out the bars. Chill them slowly in the fridge for better texture.
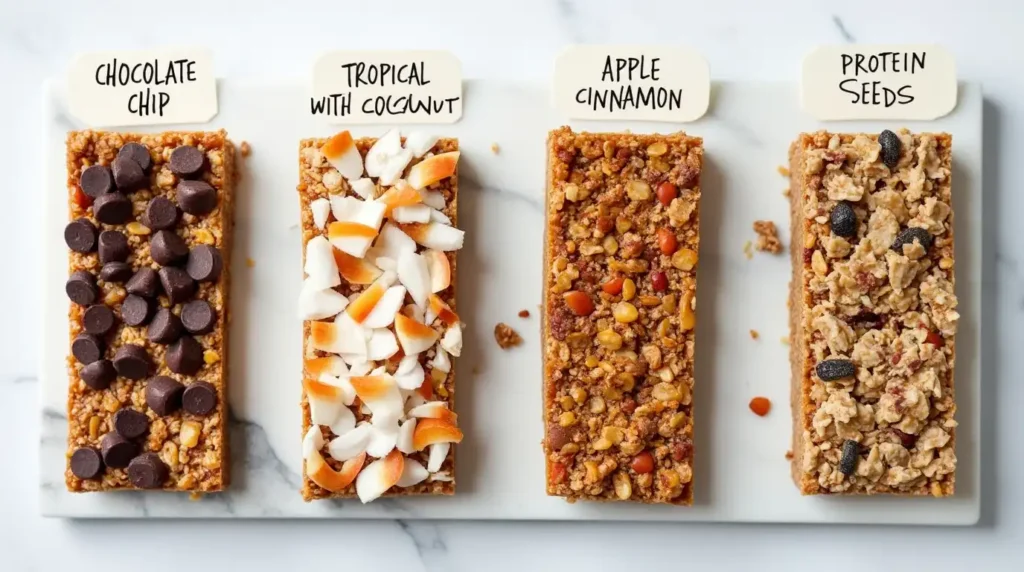
Flavor Ideas & Customization Combos
| Theme | Add-ins & Tweaks |
|---|---|
| Chocolate Dream | Add 2 tbsp cocoa powder + mini chocolate chips |
| Tropical Vibe | Use dried pineapple, coconut flakes, and macadamia nuts |
| Fall Cozy | Stir in cinnamon, dried apple bits, and walnuts |
| Protein Punch | Add ¼ cup protein powder and top with hemp seeds |
| Low-Sugar | Skip chocolate, use mashed banana and extra cinnamon |
Dietary Adaptation Cheatsheet
- Vegan? Use maple syrup instead of honey, and plant-based chocolate chips.
- Nut-Free? Swap nut butter for sunflower butter, and use seeds instead of nuts.
- Gluten-Free? Double-check oats and mix-ins for cross-contamination labels.
- Keto-Friendly? Use unsweetened nut butter, a keto syrup, and stevia-sweetened chocolate.
How can I make these look more “Instagram-worthy”?
A sprinkle of flaky sea salt or a drizzle of melted chocolate post-slicing works wonders. Or press a few toppings on the surface before chilling: coconut flakes, whole almonds, dried berries—whatever you want to showcase.
Nutrition Facts for Homemade Granola Bars (Per Serving)
Understanding what’s in your snack isn’t about obsessing—it’s about empowerment. One of the best perks of homemade granola bars is knowing exactly what you’re eating, without mystery ingredients or misleading health claims.
The following values are approximate for one bar (based on 12 bars per batch using the standard recipe):
Estimated Nutrition per Bar:
- Calories: 210–240 kcal
- Total Fat: 10–12g
- Saturated Fat: 1.5g
- Unsaturated Fats: 8–9g (from nuts & nut butter)
- Carbohydrates: 26–30g
- Sugars: 12–15g (mostly from honey/maple + dried fruit)
- Fiber: 3–4g
- Protein: 5–7g
- Sodium: ~70mg
- Cholesterol: 0mg (if vegan)
Vitamin & Mineral Highlights:
- Vitamin E (from almonds or sunflower seeds)
- Magnesium (especially if you include pumpkin seeds or dark chocolate)
- Iron (from oats and nuts)
- B Vitamins (from oats and nut butter)
How can I make these lower in sugar?
Try reducing the dried fruit by half, using unsweetened nut butter, and subbing half the honey with mashed banana or unsweetened applesauce. The texture stays solid, and the sugar drops by 5–6g per bar.
Common Homemade Granola Bar Problems (And How to Fix Them)
Even the simplest recipes can surprise you with quirks. When making homemade granola bars, texture is everything—and it’s also where things most often go sideways. Here’s a list of common mistakes and practical fixes that’ll save your batch (and your sanity).
Problem: Bars Falling Apart
The Culprit:
- Not enough binder (honey or nut butter)
- Oats too coarse or too dry
- Pressed too loosely into the pan
The Fix:
- Warm more honey and nut butter, mix in 1 tbsp at a time
- Always press the mixture down firmly and evenly—use a flat-bottomed cup
- Chill at least 2 hours before slicing
Problem: Too Hard or Crunchy
Why it Happens:
- Overbaking
- Using too little fat or sweetener
- Refrigerating too long before cutting
Solution:
- Reduce bake time (try 15 minutes instead of 20)
- Add an extra 1 tbsp of nut butter for moisture
- Let sit at room temp 5–10 mins before slicing
Problem: Sticky or Won’t Set
Causes:
- Too much syrup
- Humid kitchen
- Dried fruit too wet (especially raisins or dates)
Fixes:
- Add 1–2 tbsp extra oats and refrigerate longer
- Pat dry any sticky fruit before mixing
- Store in fridge with parchment between layers
My chocolate chips melted—what went wrong?
That’s actually common if your wet mixture is too hot when you stir it into the dry mix. To prevent melting, let the syrup cool for 2–3 minutes before mixing. Or fold in chocolate chips after pressing into the pan.
FAQ – Your Top Homemade Granola Bar Questions Answered
You’ve got questions, and chances are, someone else has wondered the same thing while whipping up a batch of homemade granola bars. Here are the most common concerns—solved.
Can I use maple syrup instead of honey?
Absolutely. Maple syrup is a 1:1 swap and works well for a vegan version. Just know that it’s slightly thinner, so you may want to reduce it by 1–2 tablespoons or add a bit more nut butter to help things hold.
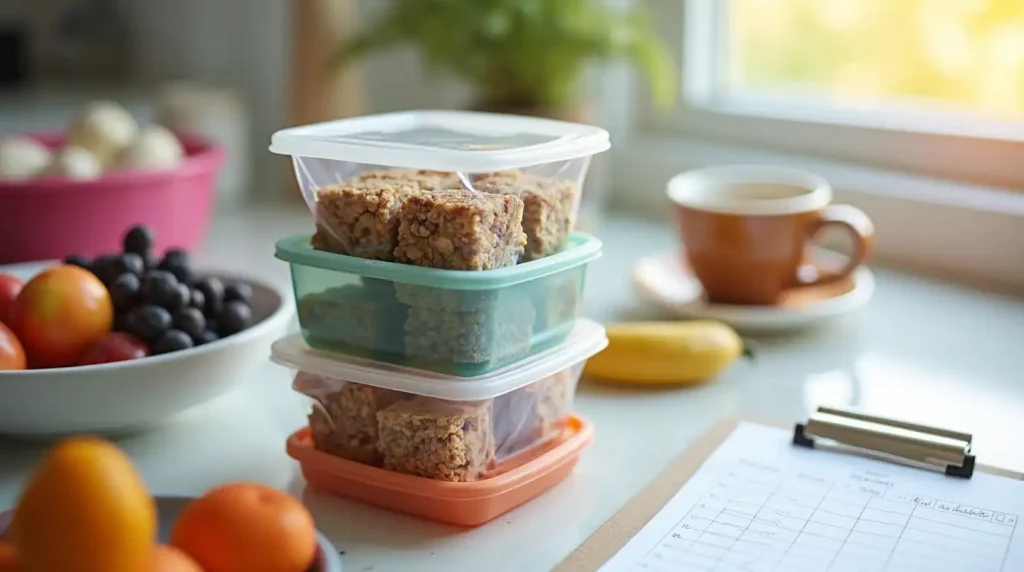
Can I make these ahead of time?
Yes! These bars are meal-prep friendly. Make a batch on Sunday, slice, and store them in the fridge for up to 10 days. For longer storage, freeze them in layers with parchment paper between each bar.
How do I store homemade granola bars?
- Room Temp: Up to 5 days in an airtight container
- Fridge: Up to 10 days (they stay firmer)
- Freezer: Up to 3 months. Thaw at room temp or microwave for 10–15 seconds
Tip: Avoid storing them warm—they’ll steam and turn soggy.
What if I don’t have nut butter?
Try tahini, sunflower seed butter, or even Greek yogurt (if not vegan). The flavor will shift slightly, but the texture will still work. Just make sure it’s thick—not runny.
Final Thoughts – Ready to Make Your Own Homemade Granola Bars?
So there you have it: a fully customizable, naturally sweetened, and ridiculously satisfying homemade granola bars recipe that fits your life—not the other way around. Whether you’re meal-prepping for the week, hunting for healthier snacks for the kids, or just trying to cut back on store-bought sugar bombs, this recipe is a keeper.
Don’t overthink it—just try it once. Mix, press, chill, slice. You’ll feel it: that “I made this” pride when you bite into the first bar.
What’s next?
- Tried the recipe? Leave a comment below and tell me your favorite mix-ins!
- Share this post with a friend who always grabs a granola bar on-the-go.
- Want more snack ideas? Check out my recipes for [Energy Bites with Dates] and [Coconut Oatmeal Clusters]—both no-bake, kid-approved, and kitchen-tested.
Your perfect bar is waiting. Now go make it.