So you want to make your own beef jerky? Excellent choice.
But before you fire up the oven or dehydrator, let’s talk about the decision that can make or break your entire batch: the cut of beef you choose.
I’ll be honest — when I first tried homemade jerky, I didn’t think it mattered. I grabbed whatever was on sale and hoped for the best. The result? Weirdly chewy, uneven, and gone rancid way too fast thanks to hidden fat I didn’t trim.
Turns out, the cut is everything.
The right cut dries evenly, chews beautifully, and stays safe to store longer. The wrong one? It can end up tough, greasy, or spoil faster than you can say “beef stick.”
But don’t worry — choosing the best cut isn’t rocket science. It’s about understanding a few basics:
Lean is better (less fat = longer shelf life).
Grain direction affects chew.
Price doesn’t have to be high if you know where to shop.
This guide will help you avoid expensive mistakes and make jerky you actually want to eat.
We’ll cover:
- Why your cut choice really matters
- The best cuts for jerky (ranked and explained)
- Budget-friendly options you might not have considered
- Tips on trimming and slicing like a pro
- How to marinate for the best results
Let’s make sure your next batch is your best yet — starting with the right cut of beef.
Why Your Beef Cut Choice Matters
Let’s get this out of the way: not all beef is great for jerky.
I know, I know — “it’s all just meat,” right? That’s what I thought, too.
But the truth is, picking the right cut is the single biggest difference between chewy, flavorful homemade jerky you’ll brag about and a tough, greasy, inedible mess you toss in the trash.
Lean Cuts = Better Drying
First, lean matters.
Fat doesn’t dry well. It doesn’t cure. Instead, it sits there like a time bomb, going rancid fast.
Even a small amount of marbled fat can ruin your batch in storage. That’s why classic jerky cuts are lean, easy to trim, and consistent.
Texture and Chew
It’s not just about spoilage.
Good jerky has that satisfying snap or chew when you bite.
The grain direction of the meat affects this. Cutting with the grain gives a more toothsome chew. Cutting against the grain makes it more tender.
If you pick a cut with inconsistent grain or too much connective tissue, you’ll end up fighting your jerky like it’s a leather belt.
Cost Efficiency
And let’s be honest — meat isn’t cheap.
Choosing the right cut means you’re not paying for a bunch of waste.
Lean roasts and rounds often cost less per pound than fancy steaks. Even cheaper cuts can shine if you trim and slice them right.
Bottom line? Your cut choice is the foundation of great jerky. Get this part right, and the rest is easy.

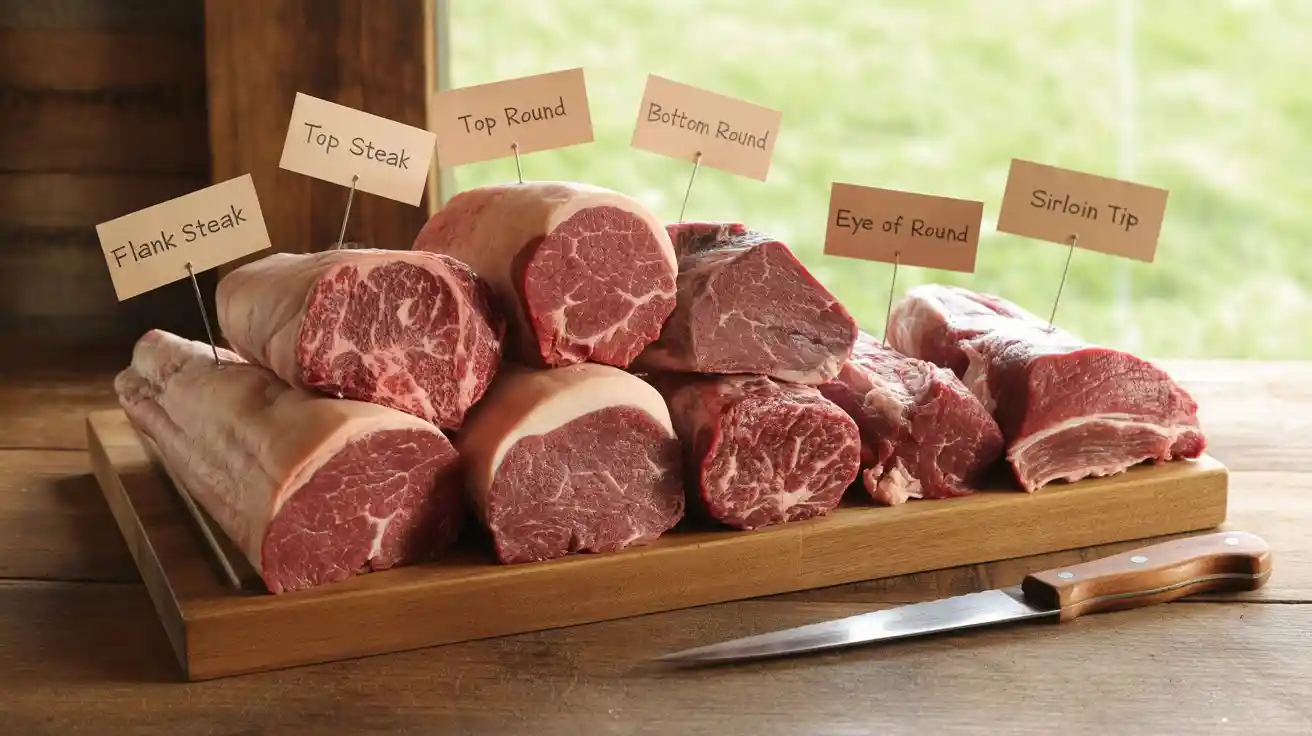
Best Cuts of Beef for Jerky (Ranked)
Alright — time to get to the meat of it. Literally.
Here are my top recommended cuts for making homemade beef jerky, ranked from classic go-to choices to some under-the-radar options you might want to try.
1. Flank Steak
My personal favorite.
Lean, flavorful, and has a long, consistent grain that’s easy to slice. When you cut it thin, it dries beautifully and gives you that satisfying chew.
Pros:
- Super lean
- Easy to trim
- Great beefy flavor
Considerations:
- Not the cheapest, so watch for sales.
2. Top Round / Bottom Round
This is the classic choice you’ll see in most jerky recipes.
Rounds are lean, affordable, and come in big, uniform slabs that are perfect for slicing.
Pros:
- Budget-friendly
- Widely available
- Easy to slice evenly
Considerations:
- Slightly less marbling = less juicy, but that’s good for jerky.
3. Eye of Round
Think of this as the leaner, more uniform cousin of the other rounds.
It’s almost all usable meat with very little trimming needed.
Pros:
- Very lean
- Consistent shape
- Minimal waste
Considerations:
- Can be a bit pricier than other round cuts.
4. Sirloin Tip
Another solid option if you want lean with a bit more natural tenderness.
Pros:
- Good flavor
- Still pretty lean
- Often on sale
Considerations:
- Slightly pricier than rounds, but worth it for texture.
5. Brisket (Advanced Option)
A wildcard.
Brisket can make amazing jerky with rich flavor, but it’s fatty. You’ll need to do serious trimming to keep it shelf-stable.
Pros:
- Deep, beefy flavor
- Unique jerky result
Considerations:
- Lots of trimming required
- Higher fat content can spoil faster
Pro Tip: Talk to your butcher. Ask for leaner cuts, and they’ll often help you select the best piece for jerky — sometimes even trimming it for you.

Budget-Friendly Options
Let’s face it — meat isn’t cheap.
Especially if you’re making big batches of jerky, those costs can add up fast.
But here’s the good news: you don’t have to blow your entire grocery budget on premium cuts. You just need to be smart about what you buy and how you prep it.
Watch for Sales and Bulk Deals
First tip? Always check sales.
Big-box stores, local butchers, even your regular supermarket will often run discounts on large cuts.
Example: I’ve snagged top round at half-price just because it was close to the “sell by” date — totally fine if you’re trimming, marinating, and drying it that day.
Buying in bulk is also huge. Many stores discount multi-packs or giant roasts. Split them up, prep them in batches, and save big over time.
Cheaper Roasts Can Shine
Don’t overlook humble cuts.
Large roasts (bottom round, eye of round, even shoulder cuts) often cost way less per pound than steaks. With good trimming and slicing, they make excellent jerky.
Tip: Slightly freezing the meat before slicing makes even cheaper, tougher cuts easier to handle.
Ground Beef Jerky: The Budget Alternative
If slicing isn’t your thing — or you’re really trying to save — consider ground beef jerky.
It’s easy to make at home with a jerky gun or piping bag.
Pros:
- Often cheaper than whole cuts
- No need for precise knife work
- Super customizable seasoning
Considerations:
- Look for leanest ground beef you can find (90–93% lean) to avoid spoilage.
- Texture is different — more like snack sticks than classic jerky strips.
Bottom line? You don’t need fancy cuts to make great jerky. Just be smart about sales, trim well, and don’t be afraid to try different options.
Trimming and Slicing Tips
Okay — you picked your cut. Good start.
But here’s the part a lot of first-time jerky makers mess up (speaking from experience here): trimming and slicing.
This is where you turn decent jerky into fantastic jerky.
Trim That Fat
First rule of homemade jerky club? Get rid of as much fat as you can.
Fat doesn’t dry properly. Instead, it stays greasy, goes rancid faster, and can even cause uneven drying.
Don’t stress about being surgical — just remove the big, obvious layers and seams.
I once thought “a little fat adds flavor,” which it does for grilling. For jerky? It’s a fast track to funky smells in your storage jar.
Chill for Easy Slicing
Here’s a pro tip that makes life 100x easier: slightly freeze the meat before slicing.
You don’t want it rock solid, but you want it firm enough that your knife glides through without squishing.
Pop your trimmed roast in the freezer for 30–60 minutes.
Check it every so often.
Once it’s firm, you’ll get cleaner, thinner, more consistent slices.
With or Against the Grain?
This one is fun because it actually changes the style of your jerky.
- With the grain: Chewier, traditional-style pull.
- Against the grain: Softer, easier-to-bite pieces.
There’s no “right” choice here — just what you like.
Personally? I do a mix so there’s variety in the batch.
Aim for Even Thickness
Uneven slices = uneven drying.
Too thick = raw in the middle.
Too thin = turns into brittle shards.
I aim for about 1/8″ to 1/4″ thick. Consistency matters more than the exact number.
Bottom line? Take your time here. Good trimming and slicing makes the drying step a breeze and gives you jerky you actually want to eat.
Marinating Recommendations
Alright — you’ve picked a good cut, trimmed it well, sliced it just right. Now comes the fun part: flavor.
This is where you can get creative, but there are a few tried-and-true principles to keep you from ruining a batch with good intentions.
Keep It Simple
First rule? Don’t overcomplicate things.
Especially if you’re new, start with salt and maybe black pepper. That’s it.
Why? Because good beef doesn’t need much. And because if you’re going for a carnivore-friendly or zero-carb approach, sugar, honey, and fancy glazes are off the table anyway.
I’ve made jerky with five-ingredient marinades that tasted worse than the plain salted batch.
Acid Helps (But Don’t Overdo It)
If you want to tenderize a tougher cut, a splash of acid can work wonders.
- Apple cider vinegar
- Lemon juice
- Even a bit of plain white vinegar
It breaks down some of the tougher fibers and adds a subtle tang.
Pro tip: A little goes a long way. Too much and your jerky starts tasting like pickles.
Season to Taste
This is your chance to make it yours.
If you’re not strict carnivore, try:
- Garlic powder
- Cracked black pepper
- Chili flakes
- Onion powder
Just avoid sugars if you want it to stay as low-carb as possible. Even so-called “savory” commercial recipes often sneak in molasses or honey.
Marinating Time
The longer it sits, the more flavor it absorbs.
Minimum: 4 hours in the fridge.
Ideal: 12–24 hours.
Just make sure you do it in the fridge. Food safety is a thing.
I like tossing everything in a big zip-top bag, squeezing out the air, and giving it a shake every few hours when I remember.
Bottom line? Don’t stress. Jerky is forgiving. Start simple, experiment slowly, and make notes so your next batch is even better.
Conclusion + Encouraging Call to Action
Here’s the truth: making jerky at home isn’t complicated — but it is all about the details.
Pick the right cut, trim it well, slice it evenly, and you’re halfway to the best batch you’ve ever made.
Skip that part and you’re fighting against weird textures, spoilage, and frustration that’ll make you swear off homemade forever.
I learned that the hard way (I’ll never forget my first batch that basically turned into greasy, salty shoe leather).
But once you get the basics down? It’s weirdly addictive in the best way.
You get to choose the flavors, control the salt, skip all the hidden sugars and preservatives, and — best of all — save money while making something you’re actually excited to eat.
My advice? Don’t overthink it. Start with a lean cut you can find on sale, trim it up, try a simple salt-and-pepper marinade, and see how you like it.
Once you nail your method, you can get creative with spices, heat, or different cuts.
Use in your main Jerky Recipe post or Carnivore Snacks pillar:
Example usage in your other posts:
Not sure what cut to choose? Check out our best cuts of beef for jerky guide before you shop.
- Anchor: safe meat handling tips
Serious Eats Homemade Jerky Guide
- Anchor: homemade jerky tips
Ready to try it? Pick one of these recommended cuts this week, give trimming and slicing a little extra love, and see how much better your homemade jerky can be. And hey — if you’ve got a favorite cut or marinade, share it in the comments. Let’s swap ideas!