Ever read the back of a store-bought jerky bag? It’s like a chemistry test.
Salt, sure. But then there’s corn syrup solids, preservatives with numbers in the name, and “natural flavors” (whatever that even means).
I used to ignore it. Honestly? Jerky is expensive enough without getting picky. I’d just grab whatever was on sale and try not to think too hard about it.
But somewhere along the line I wondered — could I make it myself? Maybe save a little money? Maybe actually know what’s in it?
Spoiler: yes. And it’s not even that hard.
I’m not going to lie to you and say my first try was beautiful. Sliced it too thick, forgot it in the oven, some pieces turned into meat croutons. But even the failures tasted better than the store-bought stuff I was paying too much for.
It wasn’t just about cost either. It felt good knowing exactly what I put in. Real beef. Salt. Spices I chose. No surprise sugar bombs or ingredients I couldn’t pronounce.
And it’s weirdly satisfying. Pulling a batch out of the oven that you made yourself? Feels like winning at adulting.
If you’ve ever thought about it but felt intimidated — you’re in the right place. This isn’t some chef-level, you-need-a-dehydrator recipe. It’s the guide I wish I’d had: real talk on choosing the right beef, simple marinades, slicing it so it actually dries properly, and using your regular old oven without burning the house down.
Because let’s be honest — once you nail it, those overpriced gas-station jerky bags just don’t seem worth it anymore.
Quick FAQ-style Answer
Why bother making beef jerky at home?
It’s cheaper, cleaner, and customizable. You choose the ingredients, avoid weird additives, and end up with high-protein snacks you actually like.
Why Make Beef Jerky at Home
Alright — I’ll be honest with you. I didn’t start making jerky at home because I was trying to be some craft food genius. It was honestly about being cheap.
Ever seen those tiny bags at the store for like ten bucks? It’s wild. And don’t even get me started on the ingredient lists — half the stuff sounds like it belongs in a lab, not in food.
It wasn’t just the price that annoyed me. I didn’t want to pay premium for sugar-laced, chemical-soaked beef strips pretending to be “healthy.” At some point I thought, Can it really be that hard to do this myself?
Turns out it isn’t. It’s one of those things that feels intimidating until you try it. Slice up some decent meat, salt it, season it the way you want, and dry it out low and slow. That’s pretty much the entire secret.
Honestly? My first batch was ugly. Some slices too thick, some too thin, and I over-salted it so badly my mouth went numb. But even then? It was better than a lot of the overpriced stuff I’d been buying.
And there’s something kind of satisfying about it. When your kitchen smells like smoky, savory goodness and you realize — I made this. No mystery sugar, no hidden preservatives. Just food you actually understand.
Plus, you get to call the shots. Classic salt and pepper? Go for it. Extra spicy? Why not. Want to experiment with smoky or even sweet-savory flavors? Do it. No company deciding what you’re allowed to have.
Why bother with homemade?
Because it’s yours. Your ingredients, your flavors, your rules. Usually it’s cheaper too, especially if you buy in bulk or on sale. Even when you mess up a little, it’s still yours — and that makes it better.

FAQ-style Q&A
Is homemade beef jerky actually cheaper?
Most of the time, yes. Buy meat on sale, slice it yourself, and you’ll get far more for your money than those overpriced gas-station bags — plus, you control exactly what goes in.
Essential Equipment for Beef Jerky
Okay — let’s clear this up right away: you don’t need some fancy dehydrator to make beef jerky.
Seriously. Don’t let anyone tell you that you have to drop $100+ just to dry some beef. I mean, dehydrators are nice. They’re designed for it. But your oven? It works just fine.
When I first tried making jerky, I assumed it’d be impossible without special equipment. Kind of a dumb assumption in hindsight, considering people have been drying meat for centuries without Amazon Prime.
Turns out you really just need a way to keep the meat at low heat for a long time, with decent air circulation. That’s it.
Oven vs. Dehydrator
Oven
- Pros: You already own it. No extra cost.
- Cons: Can be slightly uneven, and you’ll need to babysit the temp.
- My tip? Prop the door open a crack with a wooden spoon to let moisture escape. Not fancy, but it works.
Dehydrator
- Pros: Made for the job. Consistent airflow, dedicated temperature settings.
- Cons: Extra expense, takes up counter space.
- Nice to have if you really get into it — but definitely not required.
Other Stuff You’ll Want
- Wire racks or cooling racks
Keeps the meat elevated so air can circulate all around. Without them, you’re basically steaming the bottom. I learned this the hard way. - Baking sheets
For catching drips. Saves you from scrubbing burnt marinade off your oven floor. - A good sharp knife
Sounds obvious, but slicing meat thin and evenly is way easier when your knife isn’t sad and dull. - Zip-top bags or containers
For marinating. And for storage later. You don’t want your entire fridge smelling like peppered beef forever.
Look, you don’t have to buy anything fancy. Start with what you have. Learn the process. Then, if you love it, maybe treat yourself to a dehydrator later. Or don’t. Totally up to you.
Do I really need a dehydrator to make jerky?
Nope. An oven works perfectly well. It might take a little more checking and propping the door open, but you’ll still get tasty, homemade jerky without spending extra.

Choosing the Right Cuts of Beef
Alright, let’s talk about the meat itself. Because, let’s be honest — this is where I used to get lost.
Walk into the store, see ten different cuts, ten different prices, and… just kind of stand there. Do I get the fancy stuff? Cheapest? Something in the middle?
Here’s the truth most recipes won’t say: you don’t need the most expensive cut. You just want it lean. Fat is the enemy here — not because it’s unhealthy, but because it doesn’t dry well. Fat goes rancid faster.
I learned that the hard way. Bought a beautiful marbled steak thinking I was clever, and ended up with weird, greasy jerky that went off in days.
Good Cuts for Jerky
These are the classics — and for good reason:
- Top Round
Affordable, lean, easy to find. My go-to. - Bottom Round
Also lean, a bit cheaper sometimes. - Eye of Round
Super lean, nice uniform shape for even slicing. - Flank Steak
A little pricier, but great grain and texture. - Sirloin Tip
Lean and flavorful.
Honestly? Pick what’s on sale. As long as it’s lean, you’re good.
Slicing Matters (A Lot)
Here’s where I really messed up early on.
If you slice it too thick? It never dries evenly. Too thin? It can turn into beef chips.
I found about 1/8″–1/4″ thick is the sweet spot. Also — pop it in the freezer for 30 minutes before slicing. Makes life way easier.
Another choice: with the grain or against?
- With the grain: Chewier, classic jerky tug.
- Against the grain: Softer bite, less stringy.
Totally personal preference. Try both and see what you like.
Trim That Fat
If there’s visible fat, trim it. Seriously. Even a little can mess with drying and shelf life. Think of it like insurance.
Do I have to buy fancy beef for jerky?
Not at all. Pick lean cuts you can afford. Sales are your friend. As long as it’s low-fat and you slice it well, even cheaper cuts can make amazing jerky.
Marinade and Seasoning Ideas
This is the part that used to scare me off. “Marinade” sounds fancy. Like I need a culinary degree or 12 spices I’ll use once and forget in the back of the cabinet.
Truth is? Jerky seasoning can be as simple or as complicated as you want.
Early on, I completely overthought it. I’d find these complicated recipes online with fifteen ingredients. I’d try them once and then just… never again. Too much hassle.
What I learned? Even salt and pepper can make killer jerky. Seriously. You don’t have to go gourmet.
Simple, Classic Approach
- Salt + Black Pepper
Can’t go wrong. Clean, classic, tastes like real meat. - Salt + Garlic Powder
Slightly deeper flavor without effort. - Crushed Red Pepper
For heat lovers.
Spicy / Smoky Variations
- Cayenne or Chili Powder
Add a kick without weird additives. - Smoked Paprika
Brings that campfire vibe if you don’t have a smoker. - Chipotle Powder
Smoky and spicy — my personal favorite for a more BBQ feel.
Sweet-Savory Ideas (for Non-Purists)
I’ll be real — if you’re strict carnivore, skip this. But for everyone else? A hint of sweet can be amazing.
- Soy Sauce or Coconut Aminos
Adds umami. Salty and slightly sweet. - A Touch of Honey or Brown Sugar
Helps caramelize slightly, balances heat. - Worcestershire Sauce
Deep, savory, classic jerky profile.
My No-Stress Tip
Don’t overcomplicate it.
Pick 2–3 seasonings you actually like. Mix them with salt. Taste the marinade before you soak the meat. If you think, “I’d eat this on steak,” you’ll probably like it on jerky.
I used to feel locked in by recipes. Now I just experiment in small batches. Worst case? You learn something. Best case? You discover your signature flavor.
Do I have to marinate beef for jerky?
Technically, no — salt alone will preserve and flavor it. But marinating helps tenderize the meat and infuse way more flavor. Even an hour helps, but overnight is ideal.
Step-by-Step Beef Jerky Recipe Instructions
Alright — here’s the part that always tripped me up before I tried it.
I thought making jerky would need special equipment, exact measurements, some kind of hidden technique. Turns out it’s… really not.
This is genuinely something you can do in a regular oven on a lazy Sunday afternoon.
What You’ll Need
- 2–3 pounds lean beef (top round, bottom round, eye of round, etc.)
- Salt (start with about 2 tsp per pound)
- Any spices or marinades you like
- Sharp knife
- Baking sheets + wire racks
- Zip-top bags or containers
My Step-by-Step Guide
1: Trim the Fat
- Seriously. As much as you can.
- Fat = spoilage. A little won’t kill you but the leaner, the better.
- Confession: First time I skipped this, I regretted it about three days in.
2: Slice Thin and Even
- Aim for 1/8–1/4 inch thick.
- Against the grain for a softer bite, with the grain for that classic chew.
- Tip: partially freeze the meat for 30 min — way easier to slice.
3: Mix Your Marinade
- Salt + whatever spices sound good.
- Soy sauce, Worcestershire, hot sauce — go nuts if you want.
- Taste it before you dump the meat in. I learned this the hard way after an over-salted disaster.
4: Marinate
- At least 1–2 hours. Overnight is best.
- Use zip-top bags or a covered bowl in the fridge.
- Move it around occasionally so everything’s coated.
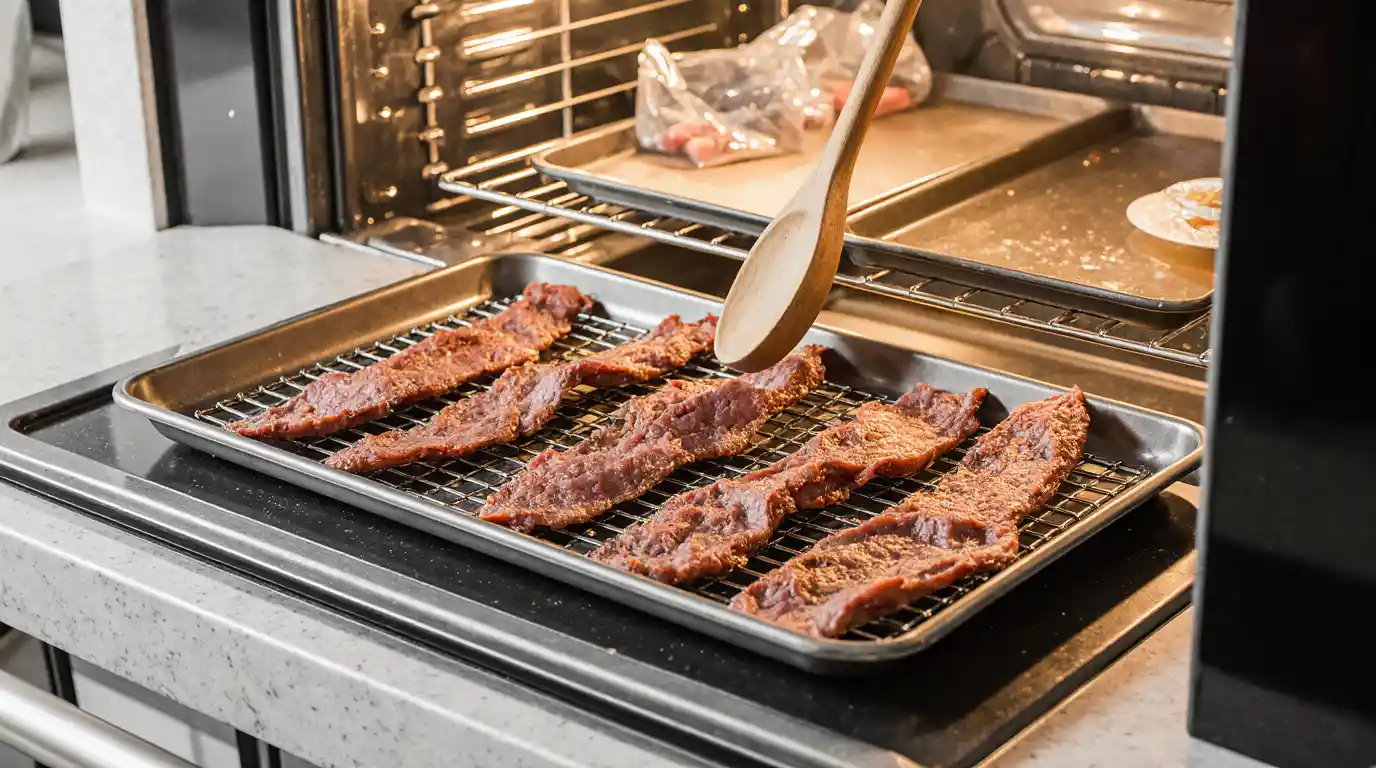
5: Prep Your Oven
- Lowest temp setting, usually 170–175 °F (about 75–80 °C).
- Line baking sheets with foil for easy cleanup.
- Place wire racks over them to let air circulate.
- Prop the oven door open slightly with a wooden spoon to vent moisture.
6: Lay Out the Beef
- Arrange strips in a single layer.
- Don’t overlap. Overlapping = steaming, not drying.
7: Dry Slowly
- 4–6 hours.
- Start checking around 4 hours — thinner pieces dry faster.
- You want it firm and flexible but not brittle.
8: Cool and Store
- Let it cool completely before packing.
- Store in airtight containers in the fridge (2–3 weeks) or freeze for longer.
My Honest Tip
Your first batch won’t be perfect. Mine sure wasn’t. But you’ll learn fast — adjust thickness, salt, heat. Pretty soon you’ll have your own go-to method.
Do I have to marinate overnight?
Nope — even 1–2 hours helps. But longer = better flavor. If you’re short on time, keep it simple with salt and spices and just go for it.
Storage and Shelf Life Tips
This is one of those questions I obsessed over at first.
I’d see people on forums talking about jerky lasting “months” and wonder if mine would give me food poisoning in a week. Turns out — it’s not that complicated.
Jerky can last a long time if you do it right. But let’s be real: most homemade batches don’t even last that long because you’ll eat it all first.
Keep It Airtight
First rule: no air, no problem.
- Use zip-top bags if you’re going through it quickly.
- For longer storage? Vacuum sealing is king.
- Airtight containers work fine too — just make sure they actually seal.
Fridge or Pantry?
Here’s where people get all perfectionist.
- Short-term (under 2 weeks): Fridge is safest. Even if you could leave it out, I don’t like gambling.
- Longer-term: Freezer. Freezes beautifully, thaws quickly.
- Pantry? Technically you can if it’s bone-dry and you trust your environment. But personally? I don’t risk it.
Watch the Fat Content
This is why I harp on trimming fat.
Fat goes rancid. Even if your jerky looks fine, old fat gets that gross smell and taste. Lean cuts = better shelf life.
Label Stuff (Future You Will Thank You)
Sounds basic, but label your bags with the date.
I’ve absolutely found a bag of mystery jerky months later and played the “should I eat this?” game.
Portion Control Isn’t Just Diet Advice
If you want it to last, portion it out.
- Keeps you from inhaling it all in one sitting.
- Reduces exposure to air each time you open a bag.
I learned this one the hard way when I kept opening the same big bag over and over. It got stale way faster.
Is homemade jerky shelf-stable?
Technically yes — if it’s super dry, low-fat, and stored airtight in cool conditions. But I always tell people: fridge it if you can. It’s safer, and the quality stays better.
FAQ-style Q&A
How long does homemade beef jerky last?
About 2–3 weeks in the fridge in airtight containers. Up to 6 months in the freezer. If it’s bone-dry and very lean, it might last weeks at room temp — but I wouldn’t bet on it.
Variations: Spicy, Smoky, Sweet-Savory
This is honestly the fun part of making jerky.
Once you get the hang of the basics — meat, salt, low-and-slow drying — you can start playing around. And yeah, I use the word playing on purpose, because sometimes it really is trial and error.
I’ve made batches that were so spicy I nearly cried. Others that were weirdly bland because I got stingy with seasoning. But that’s half the fun.
You’re not locked into one flavor. Unlike store-bought bags that basically come in “Original,” “Teriyaki,” and “Oh God, Why Is This Sweet,” you get to make exactly what you want.
Spicy Variations
- Cayenne or Chili Powder
Easy heat — just go slow. A little goes a long way. - Crushed Red Pepper Flakes
Nice for visual appeal and that slow burn. - Hot Sauce in the Marinade
Personal cheat code. Adjust to taste. - Chipotle Powder
Smoky and spicy. Love it for BBQ-style vibes.
Smoky Options
- Smoked Paprika
Easiest way to add smoke without special gear. - Liquid Smoke
Yeah, it’s controversial. But used sparingly? Amazing. - Actual Smoking
If you have a smoker? By all means — go wild.
Sweet-Savory Combos
Okay, carnivore purists — look away.
But for those of us who don’t mind a little sweet? Balance is magic.
- Soy Sauce or Coconut Aminos
Salty umami with a hint of sweetness. - Honey or Brown Sugar
Tiny bit goes a long way. Helps caramelize, too. - Worcestershire Sauce
That deep, funky, savory-sweet vibe.
My Honest Tip
Start small.
When I first tried fancy variations, I dumped in everything. Disaster. Now I do test batches in little bags. That way if it sucks? I didn’t waste all my meat.
Also — write it down. I can’t tell you how many times I nailed a flavor and then completely forgot what I did.
Can I just use salt and pepper?
Absolutely. Sometimes simple is best. Don’t feel pressured to go gourmet. Salt + pepper can make amazing jerky. Everything else is just bonus.
FAQs About Homemade Beef Jerky
Let’s be real — when I first tried making jerky, I had about a million questions I was too embarrassed to ask.
Here are the ones I googled at 2 AM.
Is homemade beef jerky safe?
Short answer: yes — if you do it right.
Longer answer? It’s all about keeping it lean, slicing it evenly, marinating properly, and drying it thoroughly at a low, safe temp.
I’ll be honest — my first batch was a little… questionable. Mostly because I didn’t trim enough fat and didn’t dry it long enough. Lesson learned.
How long does homemade jerky last?
Depends on how you store it.
- Fridge: 2–3 weeks in an airtight container.
- Freezer: 4–6 months easy.
- Pantry: Only if it’s bone-dry and stored airtight — and even then, I’m cautious.
Personally? I keep mine in the fridge. I’d rather not roll the dice.
Is it really cheaper to make it yourself?
Almost always.
Store jerky is ridiculously marked up. Making it at home means you pay for meat, spices, and a little electricity — that’s it.
Especially if you buy meat on sale or in bulk? Big savings.
Though fair warning: you might eat more of it because it tastes better. I’ve absolutely made a “month’s supply” and demolished it in a week.
Do I need a dehydrator?
Nope.
Nice to have, sure. Makes things easier and more consistent. But your oven can totally handle it.
I made jerky in the oven for ages before splurging on a dehydrator. Still do sometimes when I don’t feel like dragging the thing out.
Can I use other meats?
Yes!
- Turkey and chicken work well — just watch for fat and slice thin.
- Game meats like venison are amazing.
- Even fish can work (salmon jerky, anyone?).
Just remember: lean cuts are always better for shelf life.
What if my jerky turns out terrible?
Honestly? Join the club.
My first batch was way too salty. Another time I sliced it so thick it never dried right.
It happens. Just tweak and try again. The learning curve is part of the fun — and honestly, even “bad” homemade jerky is usually tastier than store-bought.
Conclusion and Encouraging Call to Action
Okay — real talk? If you’re still reading, you’re probably at least thinking about trying this.
And I think you should.
Not because it’s some fancy culinary achievement that’ll impress all your friends (though honestly, it might). But because it’s satisfying in a way most store-bought snacks just aren’t.
You control everything. The cut. The seasoning. The level of chew. The price. No weird additives or surprise sugar bombs. Just real food you actually understand.
Look, it’s not going to be perfect the first time. Mine sure wasn’t. I’ve made batches that were too salty, too bland, dried out, under-dried — you name it. But I learned. And now? I can crank out a batch in an afternoon without breaking a sweat, exactly how I like it.
That’s the thing about homemade anything. It’s not about being perfect. It’s about being yours.
So if you’re on the fence? Just try it. Worst case? You learn something. Best case? You’ll wonder why you ever paid ten bucks for a tiny bag of mystery meat at the gas station.
From your main Carnivore Snacks article:
- Anchor Text Recommendation: easy beef jerky recipes
- Example Placement in Main Article: In the Beef Jerky Recipe section, add:
“Want more easy beef jerky recipes? Check out our complete beginner’s guide.”
USDA Guide to Jerky and Food Safety
- Anchor: food safety tips for jerky
Anchor: additional homemade jerky tips
Give homemade jerky a try this week. Cheaper, tastier, and 100% yours. Let us know how it turns out!